|
|
|
|
 |

|
 |
BMW Garage | BMW Meets | Register | Search | Today's Posts | Mark Forums Read |
 |

|
BMW 3-Series (E90 E92) Forum
>
Yet another Lux 5.1 LED AE Install (with installation tips)
|
 |
| 04-25-2011, 09:57 PM | #1 |
|
Search or ban.


31
Rep 364
Posts |
Yet another Lux 5.1 LED AE Install (with installation tips)
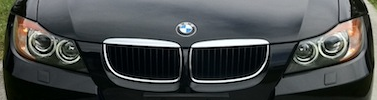
Got these babies a few days ago and decided to install them this weekend. Installation was a b*tch without taking off the wheels, but I was very adement about going about it through the engine bay. Here are a few tips that I learned along the way:
First off, it is quite possible to install the Lux set from the top without taking off the wheel. You will need the following tools: -T-15 Torx head for ratchet -Something to remove the bolts for the airbox (preferably a ratchet set) -Medium/Short flathead screwdriver As a reference, I did this using the Lux 5.1 Kit on a 2006 BMW 325i (non-LCI). I won't go into detail since there are many DIY posts for this, but I'd like to clarify some of the instructions. 1) On the drivers side, you will need to remove the airbox. This is quite easy. All you need to do is unscrew the band tensioner that connects the hose to the box, 2 screws, and remove the hose that connects the box to the front air dam. The front air dam piping is easy to take off, just use a screwdriver and twist while pulling on the box. Once the box is removed, you have plenty of room to work. Ok...not plenty...but enough! 2) Passenger side is a little more tight. I didn't remove anything in the way and still managed to get to the cover for the light. 3) Use a medium/short length screwdriver to remove the covers that seal the halo lights. There are two parts that you will need to "unclick" to take it off. I found it easier to unclick the top one first, and then pull while unclicking the bottom one. Make sure you tug on it while your undoing the clasps, as it helps. Just put your screwdriver in there and twist. Not hard. 4) The hardest part for me was removing the torx screws. I did, however find a trick to doing it. I have a torx ratcheting set that has the different torx sizings, which connects into an adapter for a ratchet. I tried using a swiveling ratchet, but that didnt work as there isnt enough space to use a ratchet. What I did was use my hand to align the torx bit, connected to the ratchet adapter, then used a flathead screwdriver to turn it. The screws arent on THAT tight, so the torque from your hand using a screwdriver was enough. Be careful when doing this, as I dropped the torx bit a few times...not fun. I ended up using a long piece of thread, which i looped through the adapter, and then connected the torx bit just in case it fell. I must have dropped it at least 4-5 times. Once you get the initial torque into the screw to losen it, you can just use the torx bit (connected to the ratchet adapter, of course) to losen the rest. Minimal tools for minimal space.... 5) Remember to identify which side is UP with the black plastic adapter that you need to reuse with the Lux kit. This will save you time, as I forgot to retain orientation, and i fiddled with it for at least 30 minutes. It doesnt just pop right into place, so have some patience when putting the plastic piece back into the headlight. 6) I'd recommend putting the plastic adapter into the headlight FIRST, and then following with putting in the LUX piece. I tried combining this step, which just made things harder for me in the long run. 7) Not sure if all are made the same, but proper orientation for me was with the plastic circuitboard thing on top of the heatsink being upside down. By this, i mean the wording was upside down. There is only one way that it can be installed, so you cant get it wrong..Just to save you some trouble. 8) Before putting the plastic cover back on, i'd highly recommend wrapping the connectors with electrical tape, as they are bare metal, and can cause a short if the + and - accidentally touch each other when you put the cap back on. Its very possible...it happened to me. Luckily, nothing shorted, and I just wrapped the connectors with electrical tape. 9) Pay attention to which connection goes where. Brown ---> Black, Green ---> Red. Double check this, as this is very important, and I don't remember 100% if this is correct. The connectors can be switched easily as they fit vice versa, so BE CAREFUL on this part. Thats about it. Overall, I give the install a 6/10 in difficulty. It wasn't easy by any means, but it wasn't tough either. If anything, it was just time consuming, especially with the vague directions that I've seen on the forums. Hopefully, these pointers will help you in getting the install completed quicker than it took me (about 2 1/2 hours). I'm very satisfied with the end results. Perfect color, and it looks immaculate. Intensity is perfect, as it isn't dull by any means, yet it isnt so bright that it drowns out any of the other lighting around it. Thumbs up for Lux 5.1!  And for the final results! Not many, but I didn't want to be one of those guys posting all words and no picture.  These pics do not do the lights justice. I will take more pics in the day/night tomorrow! These pics do not do the lights justice. I will take more pics in the day/night tomorrow!
__________________
 |
| 04-26-2011, 08:33 AM | #2 |
|
Lieutenant Colonel

55
Rep 1,690
Posts |
Looks good! That's impressive you did this without removing the wheels and liners. I couldn't imagine how much of a PITA that was cause it's a tough install with the wheels and liners removed. Nice work!
|
|
Appreciate
0
|
| 04-26-2011, 09:06 AM | #3 |
|
BimmerPost Supporting Vendor
469
Rep 4,939
Posts  |
cool write up, did you also see the install guide we have listed on our website. I still haven't updated it with the new connector information.
__________________
|
|
Appreciate
0
|
| 04-26-2011, 03:15 PM | #4 |
|
Search or ban.
31
Rep 364
Posts |
It was definitely a PITA without taking off the wheels, but still very possible. Just takes some patience and understanding of how all components work.
__________________
|
|
Appreciate
0
|
| 04-26-2011, 03:28 PM | #5 |
|
Search or ban.
31
Rep 364
Posts |
As promised, here are the day pics. Night pics to come tonight when the sun starts to go down.
__________________
|
|
Appreciate
0
|
| 04-26-2011, 08:45 PM | #6 |
|
Search or ban.
31
Rep 364
Posts |
Some more pics at night...
__________________
|
|
Appreciate
0
|
| 07-07-2011, 04:09 PM | #7 |
|
I love the ///M3, but I want 550hp ///M5
141
Rep 3,276
Posts
Drives: BMW330iE90
Join Date: May 2006
Location: NYC
|
So is it faster to just remove the wheel well? 2.5hrs? So much time that I don't really have...
|
|
Appreciate
0
|
| 07-17-2011, 08:50 PM | #9 |
|
Private First Class
 4
Rep 110
Posts |
to the above comment, agreed--
but I don't have access to a jack/breaker bar, and I don't want to purchase these items. I was looking under the hood today. I have no idea how the OP managed to do the install with the lack of space! Any further tips would be greatly appreciated. |
|
Appreciate
0
|
 |
| Bookmarks |
| Tags |
| 5.1, angel eye, halo, lux |
| Thread Tools | Search this Thread |
|
|