| 08-14-2014, 07:41 PM | #45 | |
|
10816
Rep 27,599
Posts |
Quote:
__________________
 BEFORE YOU BUY YOUR NEXT BMW, EMAIL OUR GUY KOTE FIRST! Kote M Sales:Kotem@bmwofcamarillo.com Cell:805-368-9101 vipfinance@bmwofcamarillo.com for warranties! |
|
|
Appreciate
0
|
| 08-14-2014, 07:44 PM | #46 | |
|
Ring Leader of G8X Trolls

802
Rep 1,762
Posts |
Quote:
 btw the car look phenomenal with the standard 18's. btw the car look phenomenal with the standard 18's. |
|
|
Appreciate
0
|
| 08-14-2014, 07:51 PM | #47 | ||
|
BimmerPost Supporting Vendor

8176
Rep 18,821
Posts 
Drives: BMW
Join Date: Nov 2005
Location: Anaheim, CA
|
Quote:
Quote:
__________________
Tom G. | european auto source (eas)
email: tom@europeanautosource.com · web: https://europeanautosource.com· tel 866.669.0705 · ca: 714.369.8524 x22 GET DAILY UPDATES ON OUR BLOG · FACEBOOK · YOUTUBE · FLICKR · INSTAGRAM |
||
|
Appreciate
0
|
| 08-15-2014, 08:24 AM | #48 |
|
Captain
 308
Rep 860
Posts |
you know what, this build looks great - not "stance" but more GT3 race car like esp with the 18s and the thicker tires. great look!
__________________
Gary
Current: 2020 F87 LBB|Exec|DCT|slicktop Other: 2017 F15 35i,|MPPK, 2012 F25 28i Past: 2008 E92tt 6MT, 2001 E46 6MT 2009 Z06 1997 Camaro SS 6MT |
|
Appreciate
0
|
| 08-15-2014, 01:25 PM | #49 |
|
BimmerPost Supporting Vendor
8176
Rep 18,821
Posts
Drives: BMW
Join Date: Nov 2005
Location: Anaheim, CA
|
Journal Entry 008: Rear Foglamp Mod Free mods are the best. A popular early mod on the previous E9X chassis was the Rear Foglamp, or Euro fogs. Rear fog lamps (or "fog taillamps") have since the 1970s been mandatory equipment on all cars sold in countries that adhere to European (ECE) vehicle safety Regulation 48, which governs the installation and hookup of lights and reflectors. But, they're only just beginning to show up on US-market cars. They are intense red lights manually switched on by the driver in conditions of very poor visibility (heavy fog, rain, snow) to increase your car's visibility to vehicles behind you. A rear fog lamp is very much brighter than regular taillights, and is in many cases even more intense than brake lamps. Regulations in most of the world, including North America, permit vehicles to be equipped with one or two rear fog lamps. If only one rear fog is fitted, it must be on the driver's side of the vehicle. It's safest and best to have just one rear fog, much as it offends the sense of symmetry of those who don't know any better. Having two is legal, but makes it much more difficult for following drivers to see a change in your car's rear lights when you step on the brake. Many vehicles that do come from the factory with rear fog functionality have rear fog optics and sockets on both sides, with only one wired up -- this isn't a factory oversight. It's done this way because the "driver's side" of the car varies depending on which country the car is sold in! The headlamp switch is very similar as a base F30/F32, which is equipped with front foglamps. These buttons are "blank" on the M models by injection-molded "stops", which physically limit the button from being depressed. While the quick and easy way to accomplish this would be to order a Euro Headlight switch, but where's the fun in that? Instead, we're going to mod the existing US switch. Let's begin. 1. Remove driver's side air vent, pulling slightly on outward edges  2. Remove Headlight switch, press on (2) outward retaining clips and pull  3. Disconnect headlight switch connector  4. With headlight switch on bench, slightly lift on (6) retaining tabs and separate halves 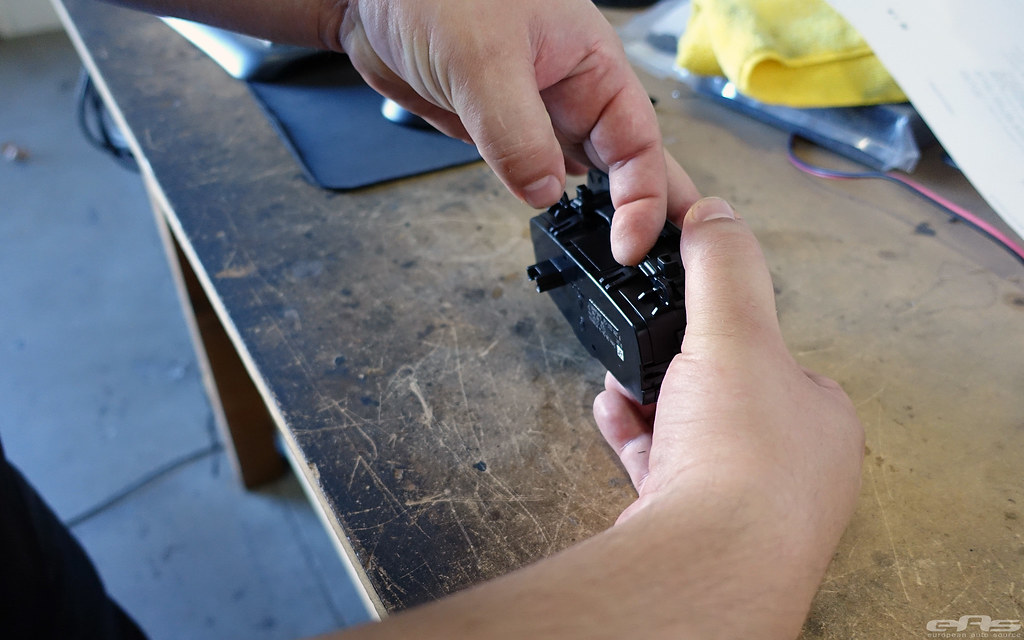 5. Pull apart plastic housing from headlight switch 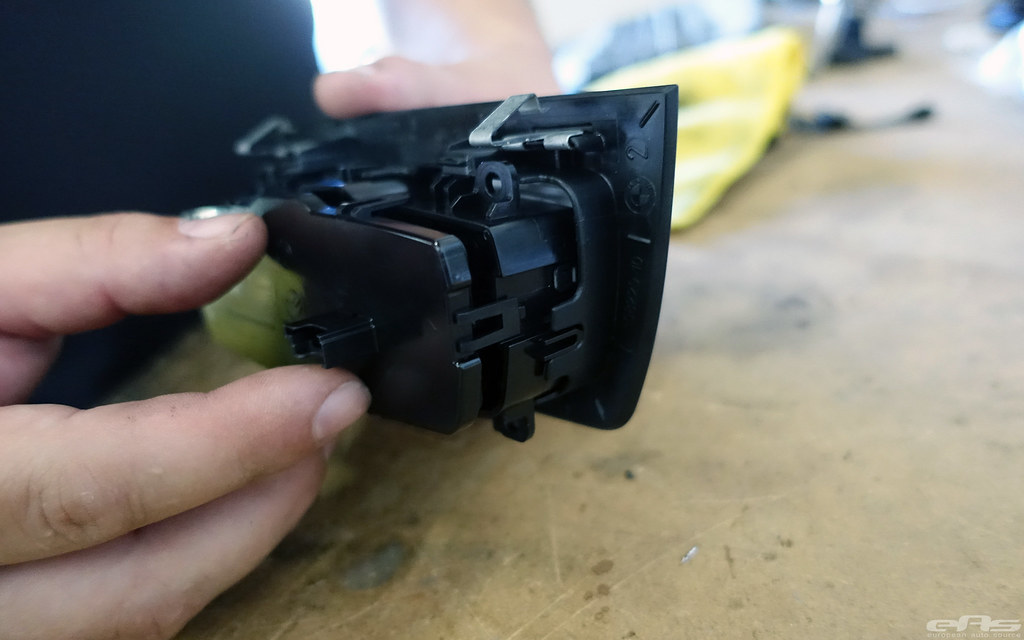 6. In this image, you can see existing buttons for Front (upper) and Rear (lower) foglamps, even the Front foglamp LED is lit on US switches when powered on. Rear foglamps when activated will illuminate an icon on the instrument cluster after coding is completed. 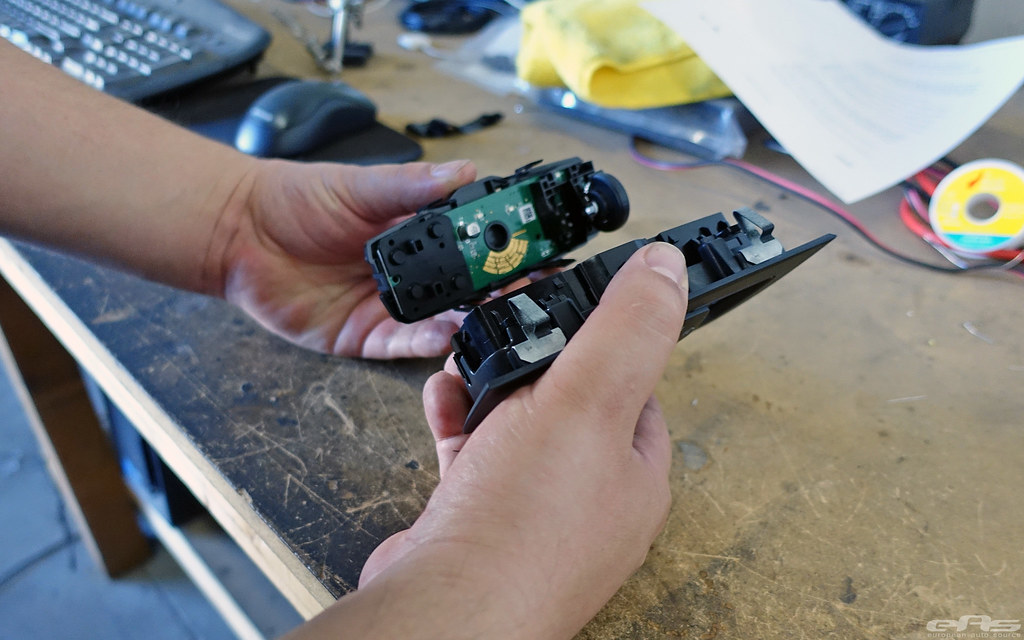 7. Position of switches, we will be working with the rear fog (bottom switch) only 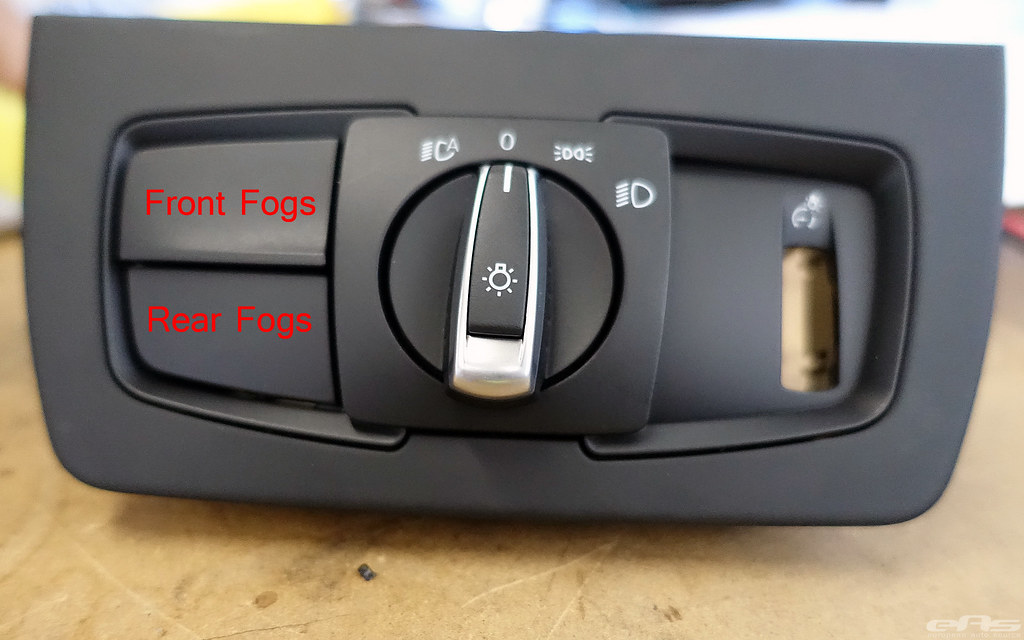 8. Press bottom switch out from backside   9. Injection-molded plastic "stops" are ingrated on US switch assemblies, these will need to be carefully removed with a hobby knife or razor. There are (3) stops total (two on other side) 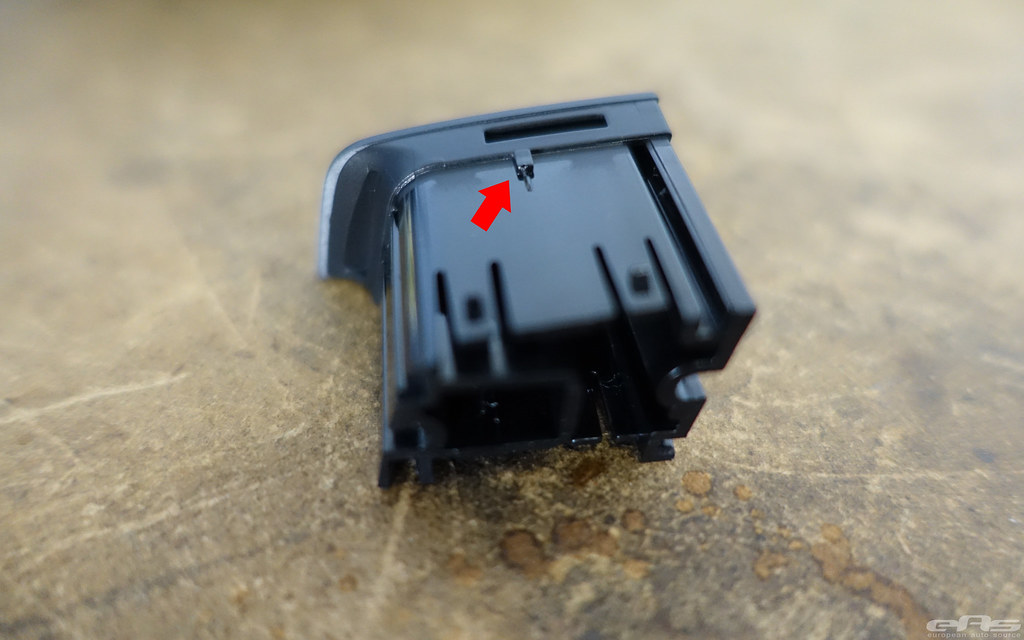 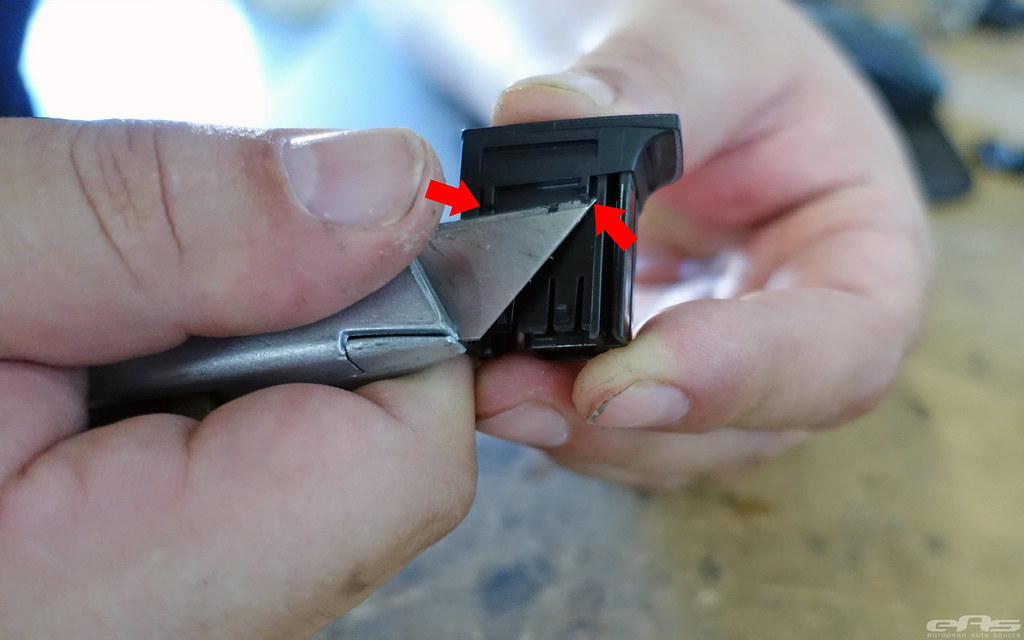 10. Reinsert Rear Foglamp back into headlight switch 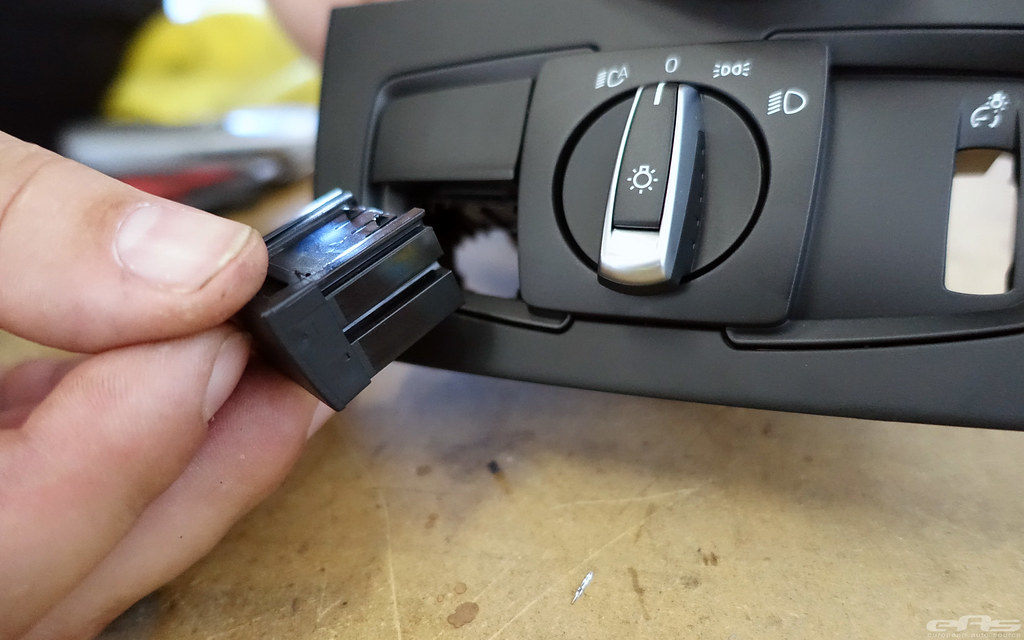 11. Completed shot, with Rear Foglamp button depressed for illustration. This will be pressed back out flush when reassembled back together. 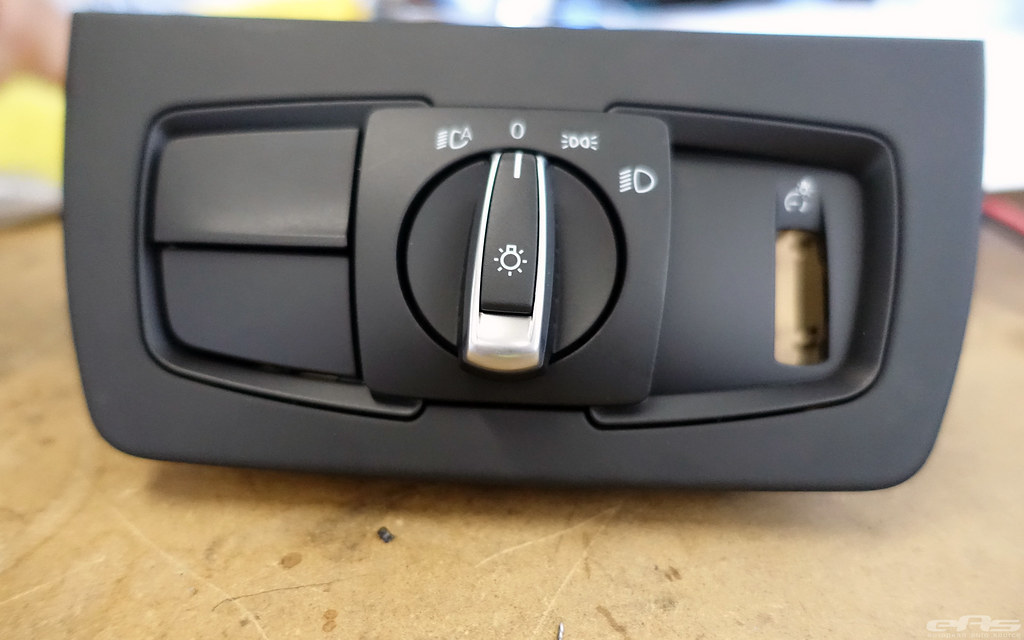 12. Reassemble headlight switch housing, snaps back into place. 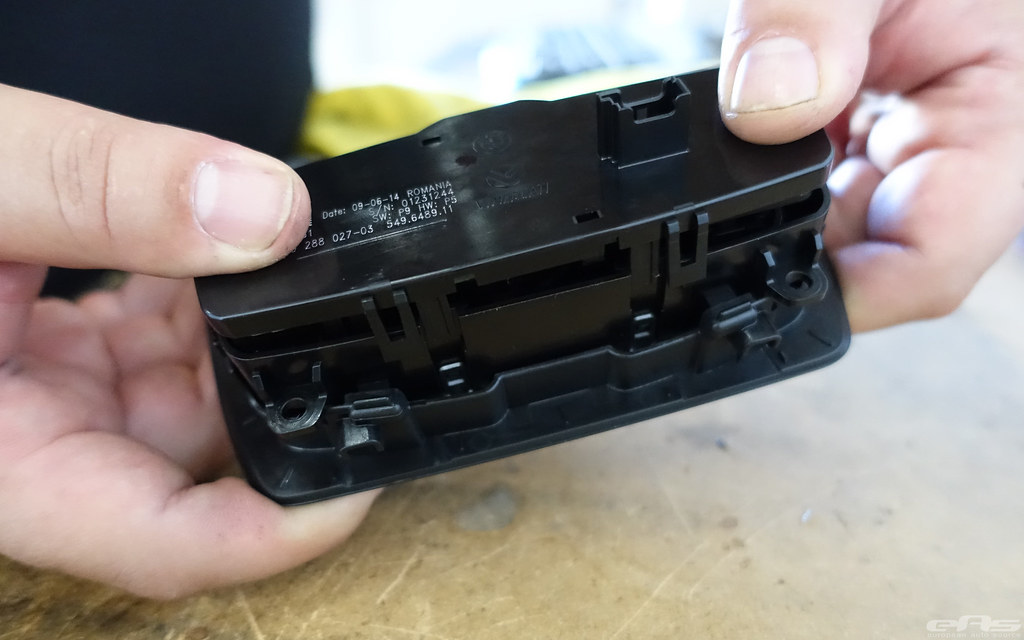 13. Reinstall headlight switch and air vent back into place  Coding Coding is required for the switch to operate. REM Module 3063 Mapping_Nebelschlussl_L_output, set to nsl_l 3063 Mapping_Nebelschlussl_L_output, set to: nsl_l FEM_BODY 3060 NSL_Verbaut: verbaut Operation Once coded, operation is exactly like if you were equipped with a EU Headlight switch. Simply flip on the headlamps, press the bottom headlight button and we are greeted with our new Rear Foglamps: Standard 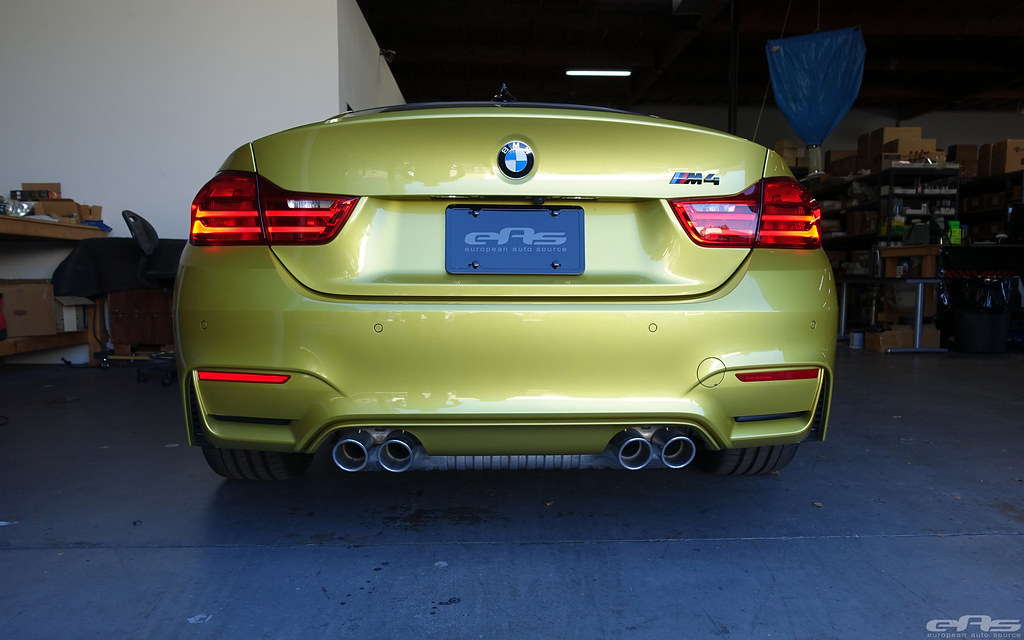 Rear Foglamps Enabled 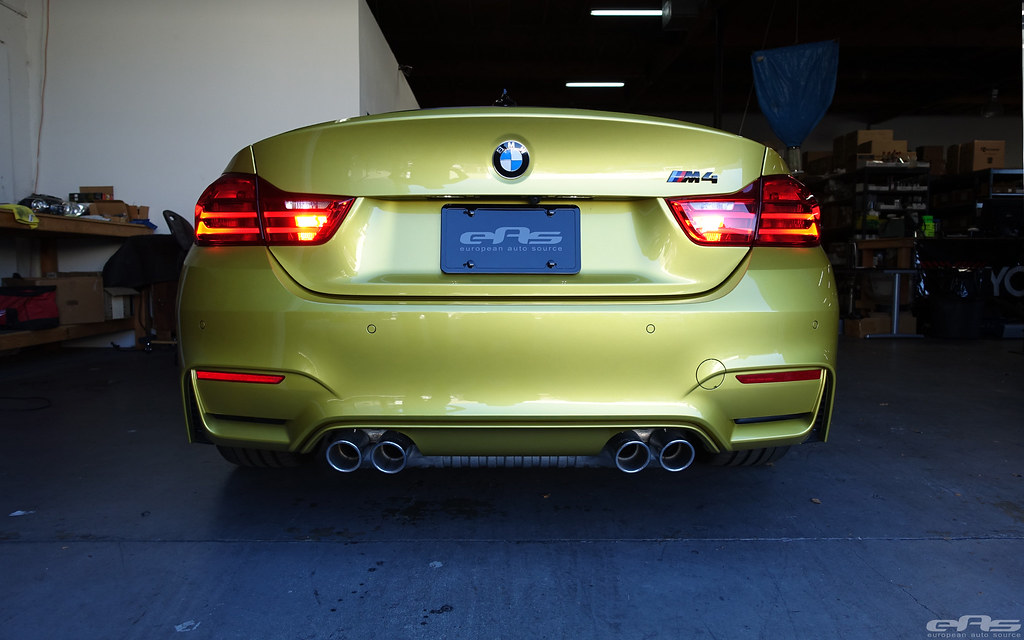 As an added bonus, an amber Rear Foglamp icon illuminates when button is activated: 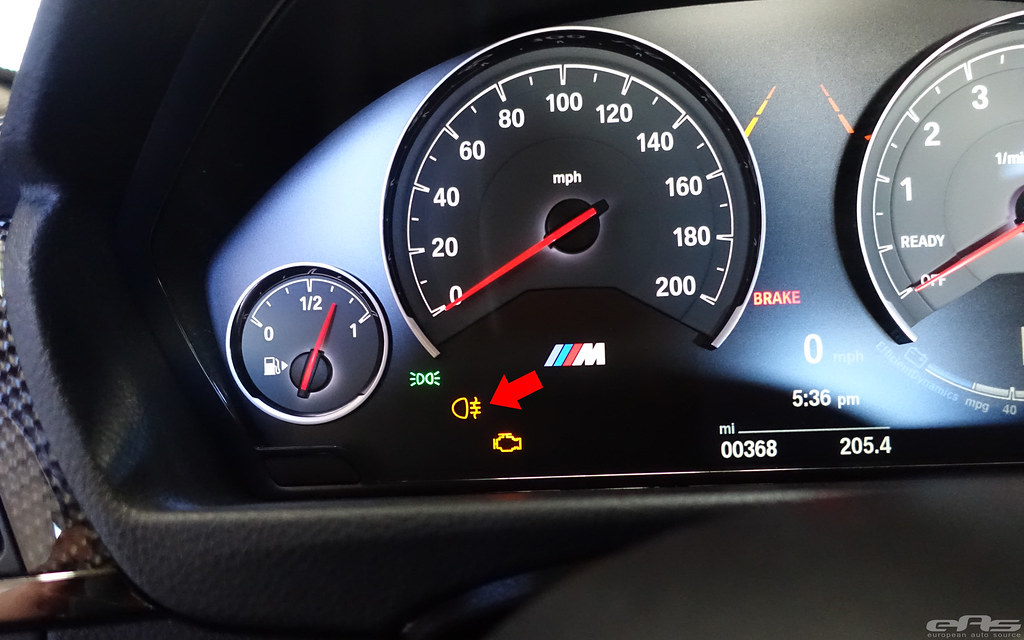 Enjoy the weekend!
__________________
Tom G. | european auto source (eas)
email: tom@europeanautosource.com · web: https://europeanautosource.com· tel 866.669.0705 · ca: 714.369.8524 x22 GET DAILY UPDATES ON OUR BLOG · FACEBOOK · YOUTUBE · FLICKR · INSTAGRAM Last edited by tom @ eas; 08-15-2014 at 03:54 PM.. |
|
Appreciate
1
|
| 08-15-2014, 02:05 PM | #50 | |
|
Captain
75
Rep 991
Posts
Drives: 2015 BMW M4
Join Date: Apr 2014
Location: Fairfax, VA
|
Quote:
 
__________________
2015 ///M4 F82 [ Mineral Grey | SO Ext | 19" Black | 6MT | CFRP Interior | LED | Executive | Side/Top Cameras | Adaptive M Suspension | HK Surround ] :: will code locally for rum, beer, or chicken; PM as desired :: Instagram: IMrMark |
|
|
Appreciate
0
|
| 08-15-2014, 04:55 PM | #51 | |
|
JOSH SHOKRI.
524
Rep 5,881
Posts
Drives: 991 GT3RS, 964, Raptor
Join Date: Aug 2005
Location: los angeles, california.
|
Quote:
__________________
Current: 16 991 GT3RS , 91 964 C2, 17 Raptor | Past: 2015 991 GT3, 2015 i3,15 YMB F80 M3, 13 E92 M3 DCT, 08 E92 M3 6MT, 07 E60 M5, 02 E46 M3
Instagram: @josh_speeddistrict #SpeedDistrict @SpeedDistrict |
|
|
Appreciate
0
|
| 08-16-2014, 09:23 PM | #53 | |
|
Deceptacon
0
Rep 26
Posts |
Quote:
Thanks |
|
|
Appreciate
0
|
| 08-18-2014, 11:36 AM | #54 | |
|
BimmerPost Supporting Vendor
8176
Rep 18,821
Posts
Drives: BMW
Join Date: Nov 2005
Location: Anaheim, CA
|
Quote:
__________________
Tom G. | european auto source (eas)
email: tom@europeanautosource.com · web: https://europeanautosource.com· tel 866.669.0705 · ca: 714.369.8524 x22 GET DAILY UPDATES ON OUR BLOG · FACEBOOK · YOUTUBE · FLICKR · INSTAGRAM |
|
|
Appreciate
0
|
| 08-18-2014, 11:44 AM | #55 |
|
BimmerPost Supporting Vendor
8176
Rep 18,821
Posts
Drives: BMW
Join Date: Nov 2005
Location: Anaheim, CA
|
Journal Entry 009: VMR V810 Photoshoot With VMR Wheels being right next door to our facility, we're able to aid in providing helpful data in helping achieve upcoming offerings in wheel fitments. With a set of wheels ready, VMR borrowed the M4 to do a quick photoshoot with their upcoming 19" V810 line in Gunmetal for the F8X M3/M4. Pictures came back today.       For those going to SoCal Euro on Aug 31, our M4 will be displaying in the VMR booth.
__________________
Tom G. | european auto source (eas)
email: tom@europeanautosource.com · web: https://europeanautosource.com· tel 866.669.0705 · ca: 714.369.8524 x22 GET DAILY UPDATES ON OUR BLOG · FACEBOOK · YOUTUBE · FLICKR · INSTAGRAM |
|
Appreciate
0
|
| 08-18-2014, 11:46 AM | #56 | |
|
Mark 42
1051
Rep 716
Posts |
Quote:
|
|
|
Appreciate
1
|
| 08-18-2014, 11:50 AM | #57 | |
|
never could compete with Lloyd Braun
5275
Rep 5,378
Posts |
Quote:
__________________
2022 G80 M3 6MT | Skyscraper Gray | Kyalami Orange
2018 F87 M2 6MT | Alpine White (sold) 2016 981 Cayman 6MT | Jet Black (sold) 2015 F80 M3 DCT | Tanzanite Blue | Gold Brown (sold) 2013 E92 M3 6MT | Mineral White | Fox Red/Black (sold) |
|
|
Appreciate
0
|
| 08-18-2014, 12:40 PM | #58 |
|
Captain
308
Rep 860
Posts |
the stock 18 inch wheels look just as good if not better, IMHO
__________________
Gary
Current: 2020 F87 LBB|Exec|DCT|slicktop Other: 2017 F15 35i,|MPPK, 2012 F25 28i Past: 2008 E92tt 6MT, 2001 E46 6MT 2009 Z06 1997 Camaro SS 6MT |
|
Appreciate
0
|
| 08-18-2014, 01:15 PM | #59 | |
|
Mark 42
1051
Rep 716
Posts |
Quote:
|
|
|
Appreciate
0
|
| 08-19-2014, 11:06 AM | #61 |
|
BimmerPost Supporting Vendor
8176
Rep 18,821
Posts
Drives: BMW
Join Date: Nov 2005
Location: Anaheim, CA
|
Journal Entry 010: Awron DGA Digital Vent Gauge It seems that BMW eliminates gauges more and more over the years. Remember when cars had an oil pressure gauge? Based out of Munich, Germany - Awron offers what might be possibly the best OEM-integrated display for BMW today. EAS has been the primary US importer for Awron digital displays for the past few years with making an introduction to the US marketplace with the E92 Kompressor 1 units and very popular with the supercharged crowd for monitoring engine vitals. Obviously, we were very eager to get one of the first units installed in our M4 once it was available. The M3/M4 Awron DGA Gauge is an all-in-one display unit that presents a wide array of real time data for the 3-Series & 4-Series. Featuring a sharp, full color OLED display, the Awron DGA gauge is easily controlled using the factory steering wheel buttons for on the fly commands. By replacing one of the factory air ducts the DGA gauge flows seamlessly with BMW's interior. Awron is also the supplier for Alpina, a respected name in the BMW community. All Awron gauges ship expertly pre-assembled into an OEM air duct piece. The effect is stunning, creating an OEM look and feel that is hard to distinguish from BMW's own quality. The predominantly orange colors used in the display match the M3's gauges nicely. All data is selectable from your OEM steering wheel buttons in both German and English languages. Units can be switched from Imperial or Metric readings. This All-in-1 gauge is the perfect option for track enthusiasts, street cars or for those just wanting to add some flair and functionality to the M3's interior. The included plug and play harness with BMW-type connectors make the job of installing this many gauges easier than ever since the S55 powerplants are already equipped with turbos from factory, obtaining the data directly from CAN. Installation is about 1.5 hours. Once completed, the finish and quality look like it was offered from BMW. Awron DGA Displayed Values - Battery Voltage - Boost Pressure / Peak Boost - Water Temperature - Transmission Temperature - Horsepower / Peak Horsepower - Torque / Peak Torque - Dyno Graph - G-Forces / Peak G-Forces - Speed / Max Speed - Stopwatch - Sprint Times - GPS Speed - Quarter Mile Time w/ Animated Countdown Screen - Wideband O2 Sensor Bank - Exhaust Gas Temperature - Fuel Rail Pressure - Intake Temperature - Oil Temperature - Oil Pressure - Maximum Values Features - Steering wheel controlled (CAN) - User defines dedicated steering wheel button - Gauge ships pre-assembled into OEM air duct - Plug & play installation - Full Color OLED Display - OEM look & feel - Integrated USB port for firmware updates While installation has already been covered in detail in our DIY thread here, here are some highlights from our install.          Who doesn't love gadgets? Most not familiar with the Awron display often mistake it for a factory BMW option.
__________________
Tom G. | european auto source (eas)
email: tom@europeanautosource.com · web: https://europeanautosource.com· tel 866.669.0705 · ca: 714.369.8524 x22 GET DAILY UPDATES ON OUR BLOG · FACEBOOK · YOUTUBE · FLICKR · INSTAGRAM Last edited by tom @ eas; 08-19-2014 at 11:14 AM.. |
|
Appreciate
0
|
| 08-19-2014, 11:39 AM | #63 |
|
I plead the 5th.
523
Rep 1,519
Posts |
Stellar product, Tom. That Awron setup looks AWESOME! Highly functional with clean integration. Having the true oil and water temps display is huge.
__________________
-Matt
|
|
Appreciate
0
|
| 08-19-2014, 05:05 PM | #64 | |
|
BimmerPost Supporting Vendor
8176
Rep 18,821
Posts
Drives: BMW
Join Date: Nov 2005
Location: Anaheim, CA
|
Quote:
__________________
Tom G. | european auto source (eas)
email: tom@europeanautosource.com · web: https://europeanautosource.com· tel 866.669.0705 · ca: 714.369.8524 x22 GET DAILY UPDATES ON OUR BLOG · FACEBOOK · YOUTUBE · FLICKR · INSTAGRAM |
|
|
Appreciate
0
|
| 08-20-2014, 11:03 AM | #65 |
|
BimmerPost Supporting Vendor
8176
Rep 18,821
Posts
Drives: BMW
Join Date: Nov 2005
Location: Anaheim, CA
|
Journal Entry 011: Valentine One Hardwire My V1 has never let me down. Its like a trusty co-pilot I've had for years, and usually one of the first things to do to a new daily. I've never been a fan of the telephone cord visible on the windshield. While V1 has recently released the Savvy, it's just additional clutter in the cabin area and I'd probably end up taking it out with a wild kick by accident one day. Instead, we'll be hardwiring the V1 to turn on/off with the ignition. Items Needed - Valentine One Radar Detector - Valentine One Hardwire Kit - RJ11 Interface Cable - (2) ScotchLock wire clips (not pictured, Red 18-22AWG) - (2) Male Spade connectors (18-22AWG) 1. Start by crimping the spade connectors onto the hardwire kit.  2. Pull off trim plate on sunroof panel/light cluster.  3. With a small pocket screwdriver, press the retaining tab while slightly pulling on sunroof module and work out of place. There are (2) retaining tabs on opposite sides.  4. Remove plastic mirror housing by pulling apart. Crimp ScotchLocks onto wires as follows: Green/Brown Stripe & Brown/Black Stripe.  5. Route Power/Ground leads through headliner to exit by driver's side of rearview mirror.  6. Pull some slack on connecting leads by driver's side of rearview mirror. 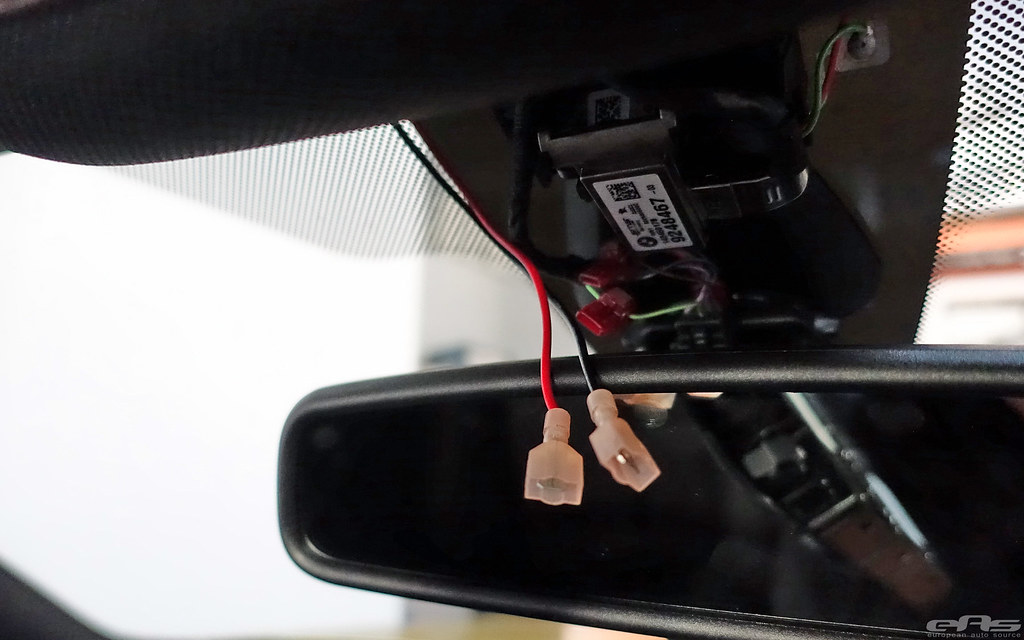 7. Connect spade connectors to ScotchLocks as follows: Green/Brown = +12V Switched/KL30 & Brown/Black = Ground. 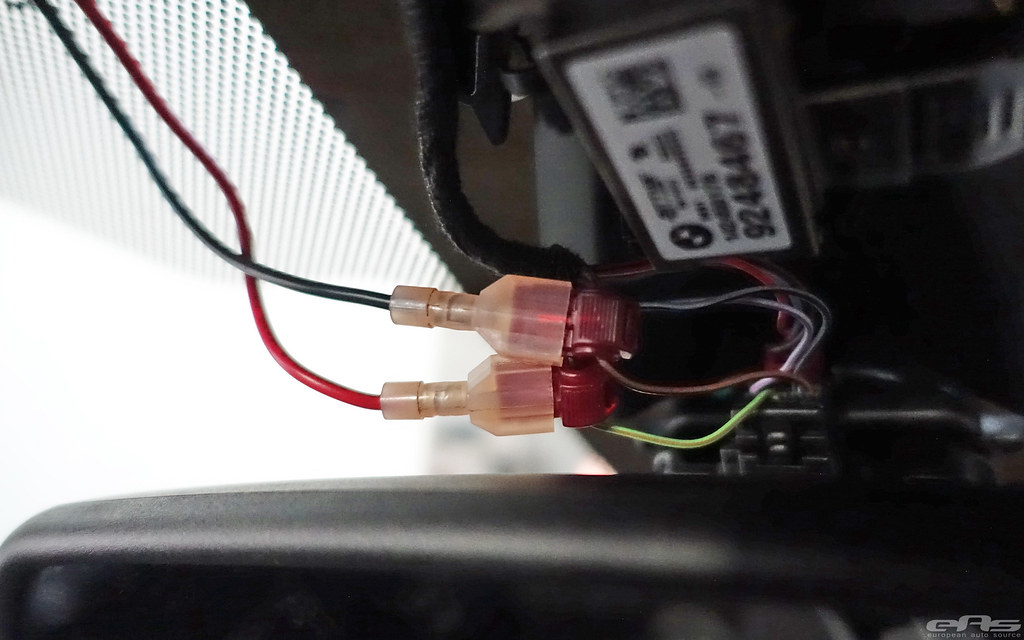 8. Connect RJ11 cable to [MAIN] port on V1 Hardwire Kit. 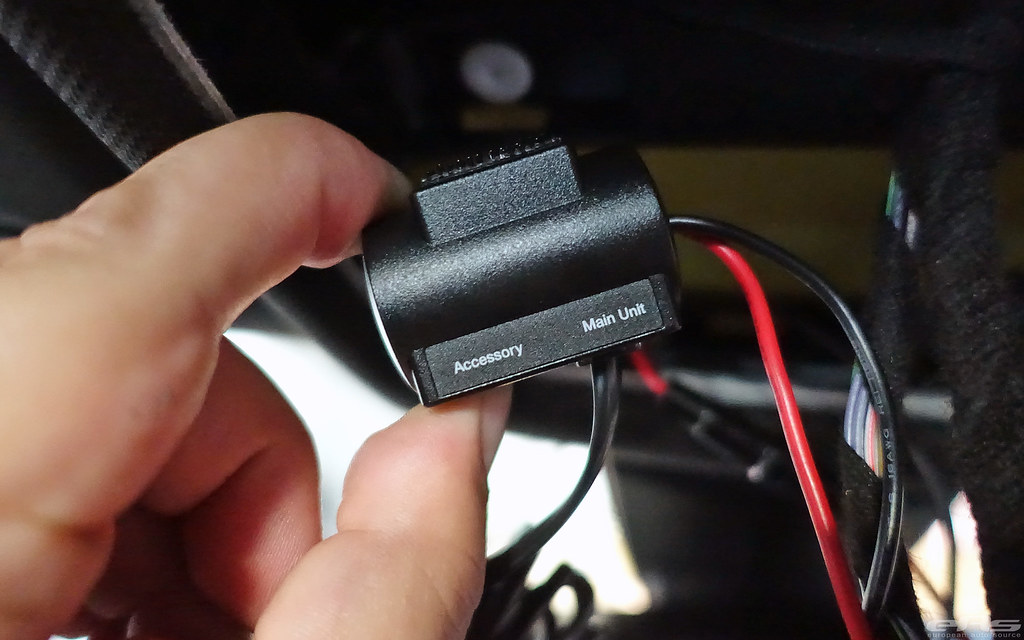 9. Reinstall mirror housing, route RJ11 cable through headliner to driver's side of mirror. 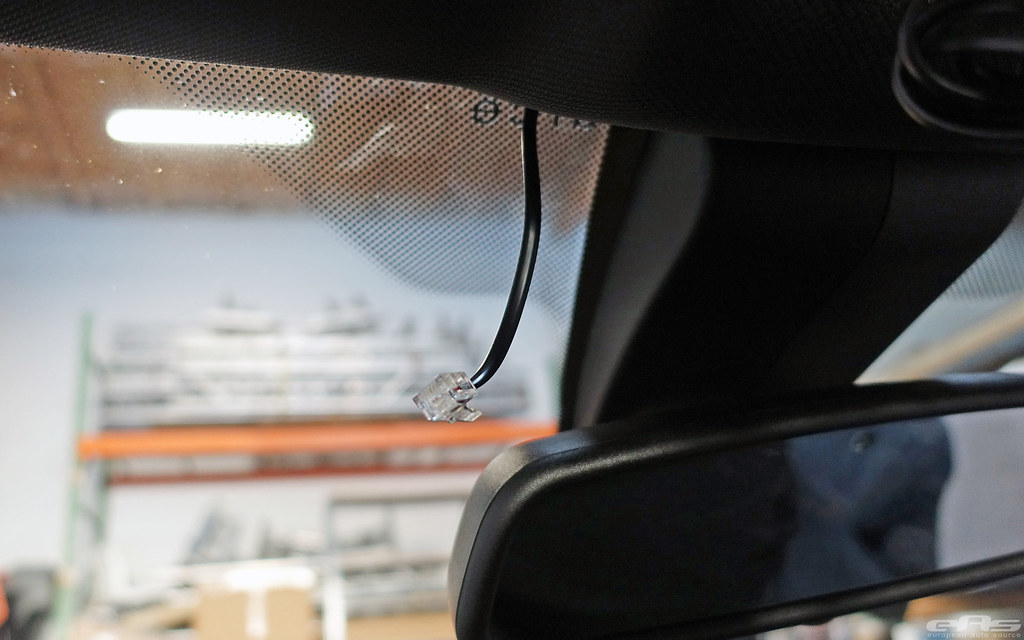 10. Reinstall remaining trim pieces and plug into RJ11 port on V1. Press START button and test. 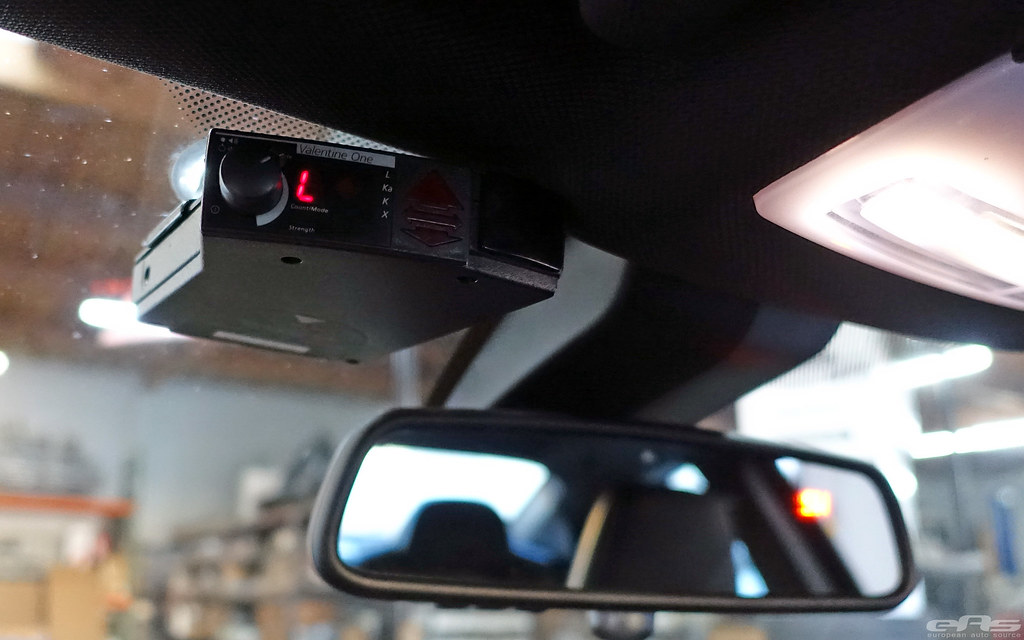 Install is complete. Verify V1 position is clear of headliner and does not interfere with sun visor. Enjoy and safe driving out there!
__________________
Tom G. | european auto source (eas)
email: tom@europeanautosource.com · web: https://europeanautosource.com· tel 866.669.0705 · ca: 714.369.8524 x22 GET DAILY UPDATES ON OUR BLOG · FACEBOOK · YOUTUBE · FLICKR · INSTAGRAM |
|
Appreciate
0
|
| 08-21-2014, 11:26 AM | #66 | |
|
BimmerPost Supporting Vendor
8176
Rep 18,821
Posts
Drives: BMW
Join Date: Nov 2005
Location: Anaheim, CA
|
Quote:
Front: 19x10 ET25 w/ 275/35-19 Rear: 19x10 ET25 w/ 275/35-19 This is the "aggressive/square setup" which is pretty much flush with the fender (specs will suit most track setups). If one wants to go with a wider tire in the rear, a 19x10 ET35 which will give some more room. For the V810, VMR already has quite a few choices coming in for the M3/M4 platforms: 19x9.5 ET25/33/40 <in stock> 19x10.5 ET25/35/45 <in production> 19x11 ET25/35 <in production
__________________
Tom G. | european auto source (eas)
email: tom@europeanautosource.com · web: https://europeanautosource.com· tel 866.669.0705 · ca: 714.369.8524 x22 GET DAILY UPDATES ON OUR BLOG · FACEBOOK · YOUTUBE · FLICKR · INSTAGRAM |
|
|
Appreciate
0
|
Post Reply |
| Bookmarks |
| Tags |
| austin yellow, development, eas, journal |
|
|